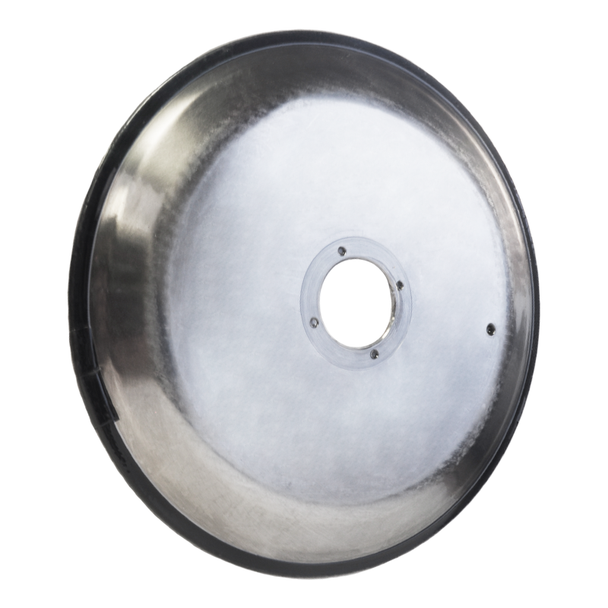
Oh my, if you've ever worked in a deli or restaurant, you know that a Hobart slicer is an absolute lifesaver when it comes to slicing meats and cheeses! But like any equipment with moving parts (I mean, it's inevitable, right?), those blades can get dull over time. And let me tell ya, replacing them ain't exactly rocket science but safety first, folks! First thing's first - you gotta make sure the slicer is unplugged. Wouldn't want any nasty surprises while we're fiddling with sharp objects. Now here's where some folks might rush; don’t be one of those! Take your time. Next up, you'll wanna remove the slicer blade; most models have a nut or screw holding it in place. You’ll need to loosen this (and remember righty-tighty lefty-loosey), so grab the appropriate tool – usually an Allen wrench or a simple screwdriver will do the trick. Don't lose that nut or screw though; they're pesky little things that love to roll away and hide! Once the blade is free (finally!), lift it off carefully. I can't stress enough how careful you need to be – these blades are sharper
Safety is of the utmost importance when using a Hobart Slicer. It's essential to follow all guidlines and take precations to avoid any sort of injury. Firstly, make sure to wear appropriate clothing such as long sleeved shirts and pants, closed-toe shoes and protective goggles or face shield. It's also important not to overfill the slicer as this can cause it to malfunction! Secondly, always use the guard provided because this will help prevent any possible contact with blades. Thirdly, never touch any part of the blade during operation for your own safety! Lastly, always ensure that the power switch is turned off before cleaning or performing maintenance on the slicer. Moreover, it's important to be cognizant of proper storage procedures for food items that are going to be sliced. All perishable items should be refrigerated until they are ready to be cut so they do not spoil while waiting in line! In addition, if you're slicing meats or poultry those products should not come into contact with other foods due in order to avoid contamination. Furthermore, keep in mind that frozen food items should not be placed directly on the slicer bed as this may
Uncovering the secrets to finding affordable Hobart slicer parts can be a daunting task! But it can be done with some clever research and savvy shopping. First off, one should always begin their search online. It's possible to find discount prices on many websites, not just in brick-and-mortar stores. However, there are also some great local shops that specialize in buying and selling secondhand items. This can be a great way to save money while still getting quality parts! Additionally, checking out eBay or Craigslist could prove to be beneficial as well. There could even be a private seller who is willing to negotiate the price of their item down so you get the best deal possible! Moreover, if you are unable to locate any secondhand parts, then consider purchasing your parts from an OEM (original equipment manufacturer). Although this may cost more upfront, it ensures you're getting high-quality components that will last for years to come. Furthermore, another good option would be ordering your parts from factory outlets or surplus warehouses; these usually carry discontinued items at discounted prices! In addition to searching online for deals, it's also important to look for promotions
Replacing your Hobart Slicer Parts can be quite a daunting task. But don't fret, it doesn't have to be! With a few simple steps and the right supplies, you can easily replace those old parts in no time. First, make sure you have all the necessary tools, such as screwdrivers and wrenches. Without these tools, replacing the parts will be almost impossible. Second, check for any broken parts or pieces that may need to be replaced as well. If so, find suitable replacements for them before beginning the replacement process. Furthermore, carefully disassemble the slicer by unscrewing all screws and nuts with your tools until you can access the part to be replaced. Then take out the old part and clean off any grime or dirt from its surface using a damp cloth or paper towel. Now you are ready to install the new part! Put it into place and secure it firmly with screws or nuts until its tightly secured in its spot. Lastly, reassemble all of the components back together again securely and double check that everything is properly installed before plugging it in! And there you have it